How to Build Custom ESXi ISO
How to Build Custom ESXi ISO
Step 1: - Download the ESXi image that you want to install(We have taken ESXi 5.5 Update 3b Patch 10)
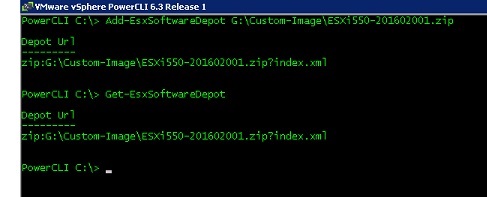
Step 2: - Connect to vMware vSphere PowerCLI and add the downloaded zip file to the software depot.
Step 3: -
Check the ESXi image profile from the depots.


Step 5: - Check for the image profile created by you


Step 1: - Download the ESXi image that you want to install(We have taken ESXi 5.5 Update 3b Patch 10)
Step 2: - Connect to vMware vSphere PowerCLI and add the downloaded zip file to the software depot.
Step 4: -
Create a new Image profile by cloning the existing Image profile that you
want to use (with vMware tools or without vMware tools)
Step 5: - Check for the image profile created by you
Step 6: - Set the acceptance level for the
profile
Note: - Acceptance level determines which VIBs are accepted for installation. We selected Acceptance level as community supported in our lab.


Note: - Acceptance level determines which VIBs are accepted for installation. We selected Acceptance level as community supported in our lab.
Step 7:- Add the software (VIBs) that you want
to add to the image profile to the software depot
Note:- This step can be merged with step 1 as
well.
Step 8: - Add the VIBs added to the software depot to the Image profile created (Test)
Step 9: - Export the Custom Image to an ISO for use
Command: - Export-EsxImageProfile –ImageProfile Test –ExportToISO –FilePath G:\Custom-image\Test.iso
Command: - Export-EsxImageProfile –ImageProfile Test –ExportToISO –FilePath G:\Custom-image\Test.iso
Comments
Post a Comment