Posts

Create Groups on AWS

How to create Group on AWS 1) Login to AWS management console 2) Search IAM in AWS services 3) Click Groups in IAM 4) Click on "create new group" 5) Specify group name 6) Select Policy to attach     Policy defined the level of permissions to the member of group.      7) Select AWS managed role based policy      AWS provides AWS managed policies for role based access. E.g. "AmazonEC2FullAccess"      or      You can select Job function related policies E.g. "NetworkAdministrator"      or      You can select Customer Managed policy (custom policies created by customer) 8) Review and click create Group Note: Groups are used for better management of access and permissions, It is recommended to use groups to provide permissions instead of providing to individual users.

Cloud Formation Script for VPC creation

Cloud Formation Script for VPC creation 1) Copy below text of script in notepad and save it as .yaml file 2) Go to AWS and cloud formation 3) click create stack 4) select template already exists and upload this .yaml file 5) It will prompt you to provide VPC name and IP range as those are kept as parameter in this template Note: make sure empty spaces are not changed before the command starts -------------------------------------------------------------------------------------------------------------- AWSTemplateFormatVersion: 2010-09-09 # This CloudFormation template deploys a basic VPC / Network. Parameters:   VPCName:     Type: String     Description: Please provide VPC name as per naming convention   CIDRBlock:     Type: String     Description: Please provide IP range for VPC e.g 10.10.0.0/16 Resources: # VPC Build   VPC:     Type: AWS::EC2::VPC     Properties:   ...

How to create NAT GATEWAY on AWS

How to create NAT GATEWAY on AWS Use of NAT GATEWAY: Nat Gateway is service provided by AWS to provide internet access to private subnet without exposing to internet through Natting. Prerequisites: EIP (public IP) and Public Subnet Steps: 1) on Home page in find services search box type "Nat Gateway" and search 2) VPC page will open 3) Click Nat Gateway from options on the left panel 4) Click create Nat Gateway 5) Select Public Subnet created as part of prerequisite 6) Select Elastic IP created as part of prerequisite 7) click create Nat Gateway Best Practice: Create Nat Gateway for each AZ to avoid single point of failure in case of AZ outage

How to create user and assign permission on AWS IAM

How to create user and assign permission on AWS IAM 1) Login to AWS management console 2) Search IAM in AWS services 3) in IAM click on users 4) click on ADD user 5) Type username that you want to create 6) select access type  Programmatic access or  AWS Management Console access or select both    a)  Programmatic access: S elect this if user need to access AWS through CLI or through Application     b)   AWS Management Console  access  : Select this if user need to login through console Note: Select only required access, if user will be used only to run scripts then do not give console access and if user will login only through console then do not give programmatic access 7) Select autogenerated password or custom password   Autogenerated password : AWS will generate random password   custom password: You need to specify password 8) Select require password reset if you want user to reset...

VMware SRM best practices

VMware SRM best practices 1) If you have different types of replicated storage for DR then create separate SRM plan for each type of storage instead of one plan 2) Keep DRS enabled at recovery site to balance the load during DR recovery 3) Create priority groups based on inter dependencies of VMs 4) Keep same ESXI versions at protected and recovery site 5) Keep separate network link for replication

How to backup and restore NTFS permissions of shared folder

How to backup and restore NTFS permissions of shared folder 1) Map shared drive to your computer/server (e.g. Z) 2) Open command prompt 3) go to shared drive (z:) 4) run command "ICACLS Z:\* /save filename /T" replace filename with name of file which you would like to give to save permissions this command will save permissions of files and sub folders inside share 5) to restore permissions run command "ICACLS Z:\ /restore filename" replace filename with name of file that you used during backup

DHCP SCOPE BACKUP , EXPORT AND IMPORT

How to take backup of DHCP server 1) Start command prompt 2) Run command "netsh dhcp server export "file name" all" to export all scopes of DHCP servers in file name specified in command How to Restore DHCP server from backup taken as per above section 1) Start command prompt 2) Run command "netsh dhcp server import "file name" all" to import all scopes on DHCP server How to take backup of particular scope 1) Start command prompt 2) Run command "Netsh DHCP server v4 export "Scope name" "subnet" How to restore only particular scope 1) Start command prompt 2) Run command "Netsh DHCP server v4 import "Scope name" "subnet"

Change Windows based vCenter 6.5 service account name

Image
How to change windows based vCenter 6.5 service account name  In vSpeher 6.5 windows based vCenter does not have a separate service in services.msc as it used to be till vSphere 6.0. In vSphere 6.5 it runs as a standalone server rather than a service.  This makes difficult for admins to change the name of the vCenter service account if someone wants to change it post installation. Below are the steps to change the service account for a windows based vCenter instance. Before you proceed please take a snapshot of the vCenter VM  or backup the system in case of physical machine. Step 1 :  First you need to check with which account the service is running. Please go to task manager or use powershell to get the service account details. Step 2:   Go to "C:\ProgramData\VMware\vCenterServer\cfg\vmware-vmon\svcCfgfiles" and  Step 3:   Edit files  .state_vpxd ,  .state_vdcs ,  .state_perfcharts and ....

Script to ping multiple devices

Script to ping multiple devices This Script can be used by admins to generate a ping response to any device in a one go. It can be used to check the connectivity to a number of devices post activity in a one go. Prerequisite:- 1. Windows PowerShell How To:- 1. Provide the devices name in a .csv file (file name devices.csv) and keep that file on system drive(C:) 2. csv file should have two columns dev and ipaddress. dev column should contain device hostnames and ipaddress column should have device ipadderss.  3. Script is tested and safe to run. 4. Result will be saved on the C drive, if you need to save it somewhere else then please modify the last line of the script with the desired path 5. Out-put of the script will be saved in a .csv format. Code:- $report=@() $Devs=import-csv "$env:homedrive\Device.csv" foreach($dev in $devs){ $data=''|select Host, IP, Result, Response $data.host=$dev.dev $data.IP=$dev.ipad...

Script to find Datastores with extent

Script to find Datastores with extents This script will help VMware admins to find VMFS datastores with Extents (more than one Lun). Prerequisite:- 1. Supported VMware PowerCLI Version  How To :- 1. Save the code in a .ps1 file. 2.  Run the script in VMware Powercli. 3. It will prompt for the VC name against which it needs to be run, an Esxi name can also be                provided, if it needs to be run against only one Esxi followed by the credentials. 4. Script is tested and safe to run. 5. Result will be saved on the C drive, if you need to save it somewhere else then please modify the last line of the script with the desired path. 6. Out-put of the script will be displayed on screen. 7. Result will only be shown if there are Extents, in case of no Extents output would be empty. Code:- $vc=read-host provide the vCenter Name write-host -foregroundcolor green "Connecting to VC" $vc get-vc $vc $x=...

Script to get WWN and WWPN of hosts

                      Script to get WWN and WWPN of hosts This Script helps VMware admins to gather the WWPN and WWPN of all the ESXi hosts quickly. Prerequisite:- 1. Supported VMware PowerCLI Version 2. CDP should be enabled on Network Switches How To :- 1. Run the script in VMware Powercli. 2. Save the script in .ps1 format. 3. It will prompt for the VC name against which it needs to be run, an Esxi name can also be provided, if it needs to be run against only one Esxi followed by the credentials. 4. Script is tested and safe to run. 5. Result will be saved on the C drive, if you need to save it somewhere else then please modify the last line of the script with the desired path 6. Out-put of the script will be saved in a csv format. Code:- $report=@() $vc=read-host provide the vCenter Name write-host -foregroundcolor green "Connecting to VC/ESXi" $VC get-vc $vc ...

Script to Gather CDP

                               Script to Gather CDP  This script helps VMware admins to gather the CDP report along with the allowed VLANs on each interface(vmnic) Prerequisite:- 1. Supported VMware PowerCLI Version 2. CDP should be enabled on Network Switches. How To :- 1. Run the script in VMware Powercli  2. It will prompt for the VC name against which it needs to be run, an Esxi name can also be                provided, if it needs to be run against only one Esxi followed by the credentials. 3. Script is tested and safe to run. 4. Result will be saved on the C drive, if you need to save it somewhere else then please modify the last line of the script with the desired path. 5. Script will take some time during execution. 6. Out-put of the script will be saved in a csv format. Code:- $vcs=read-host provide the ...

How to Build Custom ESXi ISO

Image
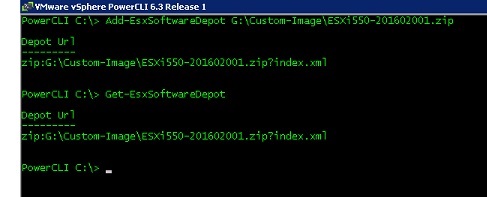
                              How to Build Custom ESXi ISO Step 1: - Download the ESXi image that you want to install(We have taken ESXi 5.5 Update 3b Patch 10) Step 2: - Connect to vMware vSphere PowerCLI and add the downloaded zip file to the software depot. Step 3: -  Check the ESXi image profile from the depots. Step 4: - Create a new Image profile by cloning the existing Image profile that you want to use (with vMware tools or without vMware tools) Step 5: - Check for the image profile created by you Step 6: - Set the acceptance level for the profile Note: - Acceptance level determines which VIBs are accepted for installation. We selected Acceptance level as community supported in our lab. Step 7:- Add the software (VIBs) that you want to add to the image profile to...

Removing ESXi Host from vCenter when vCenter is not available

Image
        How To Remove Host from Vcenter without logging into Vcenter   Step 1: Connect to Esxi Host using Vsphere client. Step 2: Select the Host Step 3: Go to summary tab on the right window Step 4: Scroll down till end Step 5: Click on Disassociate host from vCenter Server

How to change OS Edition using commands

How to change OS Edition using commands 1) Open power shell 2) Run command " DISM /online /Get-CurrentEdition"     It will give you current edition of the server     (DISM is deployment image servicing and management tool) 3) Run command " DISM /online /Set-Edition:ServerDatacenter /ProductKey:XXXXX-XXXXX-XXXXX-XXXXX-XXXXX /AcceptEula ," Enter edition you want to upgrade (I have added datacenter in command) and product key It will install this product key and change edition to datacenter 4) Run command " DISM /online /Get-CurrentEdition" again to verify edition of OS

How to resolve RDP issue after renaming terminal server windows 2012 R2

How to resolve RDP issue after renaming terminal server windows 2012 R2 Problem: After renaming windows 2012 R2 server having terminal server role RDP stops working Resolution: Reinstall Remote desktop services on server to resolve the issue.

How to check deleted objects in AD

How to check deleted objects in AD 1) Type LDP.exe on command prompt and press enter      It will open LDP console 2) Click on connection and select connect 3) enter Domain controller name in server and select port 389.click OK 4) Click connection and select BIND 5) Enter username and password 6) Click on Options and select controls 7) In controls select "return deleted objects" from drop down of "load predefined" option 8) Enter value "1.2.840.113556.1.4.417" in object identifier, select server, check critical and add description. 9) Click on check in and press OK 10)  Click on view and select Tree 11) Enter Base DN "cn=deleted Objects,dc=mapoinfotech,dc=com" and click OK 12) It will show all deleted objects tree view in left pane

How to resolve system state backup failure issue of 2008 server

How to resolve system state backup failure issue of 2008 server ISSUE: System state backup of windows 2008 or 2008 R2 server fails. CAUSE: if any service on widows 2008 server has wrong path then it fails system state backup. SOLUTION:  1) Go to start and RUN, enter MSINFO32.EXE 2) It will open system information window 3)  Open SOFTWARE ENVIRONMENT --> SERVICES 4) Check all services and find out service having "/" or space in the path of service. 5) Note down the service name and service display name having issue in Path 6) Open registry editor (regedit.exe) and go to HKEY_LOCAL_MACHINE\SYSTEM\CurrentControlSet\services Find out service by its service name noted in step 5 7) Rectify the image path of service to the correct path (change / to \ or remove space) 8) Restart server after making changes 9) Test system state backup

Vcenter 6.0 Installation

Image
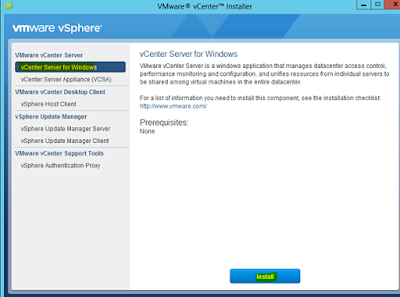
                                                                         This post describes how to install vCenter 6.0 on Windows vCenter Server requires a 64-bit operating system such as Windows 2008 R2, Windows Server 2012 and Windows Server 2012 R2.  Please do check the hardware and software requirements for the vCenter installation. Step 1: Mount the vSphere 6.0  installation media. The installation wizard appears. In the left pane select “ vCenter Server for Windows ”  and click on Install . Step 2: Click Next to proceed Step 3: Accept the License agreement and click Next to proceed Step 4: Select the deployment model. Note : Refer h ttps://kb.vmware.com/selfservice/search.docmd=disp...

How To Recover Crashed Windows Server On AWS

How To Recover Crashed Windows Server On AWS         SYMPTOMS:  Windows server on AWS does not come up and it fails on one check out of TWO system checks.   CAUSE: changes in windows settings or firewall which is causing system not to come on network resulting in failing system checks   RESOLUTION:   1) Launch new temoparary isntance in same availiability zone. 2) Detach root volume from affetced INSTANCE 3) Attach volume to new instance and bring it online from disk manangement of temporary server 4) Open regedit.exe on temporary server and click on HKEY_LOCAL_MACHINE 5) G o to File menu and select Load Hive and browse the file on the attached volume <letter>:\Windows\System32\config\SYSTEM 6) Set Recover as key name 7) Once loaded, Open the new imported system hive 'HKEY_LOCAL_MACHINE > Recover' 8) Click on the 'HKEY_LOCAL_MACHINE > Recover> Select' , inside you will see 4 keys - ...